AI (especially LLMs) are taking over the world right now. The pace of progress has been especially dizzying this year, with every month producing a new breakthrough in the technology (e.g Opus 4.6, OpenClaw). As with all technologies, it is also important to have a grasp of the basics. And what better way to learn the basics than trying to run an LLM in your computer!
We are all familiar with the popular AI tools (LLMs) like ChatGPT and Claude. These services are running on what is called frontier models, which are the best models that is available in the market right now. But these models are usually paid, either per token or through a usage quota. If you want have a “free” LLM, then you have to run your own model using your machine. For this, we need to use open source (or more accurately open weight) models. Fortunately, we have a wide selection of models:
- Large tech companies – Llama (Meta), GPT-OSS (OpenAI), Phi (Microsoft)
- Other AI companies – Mistral
- Chinese models – DeepSeek, Qwen (Alibaba)
To run these models effectively, you will need a machine with a GPU. A CPU can be used, but is going to run slower. You also need another tool to actually run the model, such as Ollama.
My machine is a Zenbook S14 which is an ultra-thin laptop with Intel Core Ultra 7/9 Series 2 (Lunar Lake). For LLMs, it can provide 3 acceleration options:
- Intel Arc 140V iGPU – the primary accelerator; uses Intel’s new XE2 graphics architecture IT Pro, and the Lunar Lake SoC integrates the RAM directly on the chip, which shortens the distance between CPU and memory for higher bandwidth and lower latency
- NPU (Neural Processing Unit) — delivers up to 47 NPU TOPS for modern AI applications; useful for specific inference tasks but limited model support today
- CPU — fallback; slower but works universally
As of this writing, NPU support is still being actively developed, so we will focus on running the LLM using the CPU and GPU.
In order to run an LLM, we can go with these options:
- LM Studio – easiest way to run local models, but is way too easy for our purpose
- Ollama – most popular option, but no clear support for Intel GPUs
- IPEX-LLM – can utilize Intel GPUs
However, IPEX-LLM’s Github repository was archived in January 2026. As I don’t want to use an unsupported library, I need to explore other options. I still want to maximize the resources available to my Zenbook, so I found an alternative: Intel’s OpenVino Toolkit.
OpenVINO is an open-source toolkit for deploying performant AI solutions in the cloud, on-prem, and on the edge alike. Develop your applications with both generative and conventional AI models, coming from the most popular model frameworks.
https://github.com/openvinotoolkit/openvino
Before we begin, we want to define what are the model types that OpenVino can run:
- Conventional AI models – deterministic and structured output, for analyzing and classifying if the input falls under a certain category (e.g. is this a cat or a dog?)
- Generative AI models – the output is not fixed, and is generated sequentially. LLMs fall under this category and this is the model most people are familiar with (e.g. GPT, Sonnet)
OpenVino can handle both model types, but for our purposes, we will focus on the Generative AI capabilities since we want to run a local LLM. For LLMs to run, we will need the Tokenizer and the GenAI libraries.
Python
Python is the de facto language of machine learning tools, so we need to install it in Windows first. You can get the installer from the official website here.
NOTE: As of this writing, Python 3.14 does not have the wheels included for Numpy and could have issues when installing using Windows. We will use version 3.12 instead.
Open PowerShell and confirm that Python is installed and available. You don’t need to run this as root and is actually not advised when following the steps below.
> python --version
Python 3.12.10
Next, we create the Python virtual environment so that we can install the dependencies using the Python version. We will name this environment openvino_env.
> cd $HOME
> py -m venv openvino_env
> .\openvino_env\Scripts\Activate.ps1
Since you are not running these commands as root/admin, you may encounter an error like:
> .\openvino_env\Scripts\Activate.ps1

.\openvino_env\Scripts\Activate.ps1 : File C:\Users\User\openvino_env\Scripts\Activate.ps1 cannot be loaded because running scripts is disabled on this system. For more information, see about_Execution_Policies at
https:/go.microsoft.com/fwlink/?LinkID=135170.

At line:1 char:1
+ .\openvino_env\Scripts\Activate.ps1
+ ~~~~~~~~~~~~~~~~~~~~~~~~~~~~~~~~~~~
    + CategoryInfo          : SecurityError: (:) [], PSSecurityException
    + FullyQualifiedErrorId : UnauthorizedAccess
If this happens, you just need to allow the current user to run scripts:
Set-ExecutionPolicy -Scope CurrentUser -ExecutionPolicy RemoteSignedAnd when you activate the virtual environment, you will now be shown a prompt:
(openvino_env) PS C:\Users\User>OpenVino and dependencies
From here, we can now install the dependencies. We begin with the OpenVino libraries:
> python -m pip install --upgrade pip setuptools wheel

> pip install openvino openvino-tokenizers openvino-genai- openvino — the core runtime
- openvino-tokenizers — for optimized tokenization since we will run LLMs
- openvino-genai — the generative layer (LLM logic)
The openvino-genailibrary provides the missing pieces needed to run LLMs, such as:
- Token-by-token generation loop
- KV cache handling
- Sampling logic
- Streaming support (for chats)
The models that we will use are open-weight models from Hugging Face. If you are not familiar, you can think of Hugging Face as the “Github” of machine learning models. Models downloaded here are usually using the Pytorch format, which OpenVino cannot use. Because of this, we will also need to install the optimum library. This converts the model into a format that OpenVino can use.
> pip install "optimum[openvino,nncf]" transformers huggingface_hub accelerateOnce everything is installed, confirm that OpenVino is installed properly by running:
> python -c "import openvino as ov; c=ov.Core(); print(ov.__version__); print(c.available_devices)"

2026.0.0-20965-xxxxxxxx-releases/2026/0
['CPU', 'GPU', 'NPU']
The result means OpenVINO successfully detected all three execution backends on the laptop:
- CPU – uses Intel Core Ultra
- GPU – uses Intel Arc Xe2
- NPU – built in Neural Processing Unit
Our goal is to to run the LLM using the GPU. NPU support is still in active development so may not be stable.
Downloading and converting the model
When running local LLMs for the first time, it is important to use smaller, lightweight models first for these reasons:
- You need to prove first that your set up and configuration is correct. You could waste time debugging the actual model when the problem is actually on the OpenVino configuration.
- Smaller models can be downloaded quicker, so you can iterate more quickly when you change or fix something.
- You do not stress the machine too much while you are still proving that LLMs can run properly.
With these in mind, we will start with microsoft/Phi-3.5-mini-instruct, a lightweight model from Microsoft. This is a small LLM with around 3.8B parameters.
To organize our LLM downloads, we can create a separate folder (as these can get quite large):
> cd $HOME
> mkdir LLM
> cd LLM
The optimum library can be used both for downloading the model from Hugging Face (as we installed huggingface_hub earlier) and converting the model in a single command:
optimum-cli export openvino `
  -m microsoft/Phi-3.5-mini-instruct `
  --task text-generation-with-past `
  --weight-format int4 `
  --trust-remote-code `
phi3-mini-ov- The
--task text-generation-with-pastflag is needed for efficient LLM performance - The
--weight-format int4compresses model weights to 4-bit so it can run on the laptop. My machine can handle keeping it to 8-bit, but for our purposes we will keep everything lightweight Phi-3.5-mini-instructuses custom model code, so it needs the--trust-remote-codeflag to run properly (other models may not need this)phi3-mini-ovis the output folder where the model will be downloaded
If you get this error when converting the model:
'DynamicCache' object has no attribute 'get_usable_length' We will need to downgrade the transformers package as it is not compatible with the latest version.
> pip install "transformers==4.53.3" "accelerate==1.13.0"Then delete the downloaded files before re-running the command:
> rmdir phi3-mini-ov -Recurse -Force

> optimum-cli export openvino `
  -m microsoft/Phi-3.5-mini-instruct `
  --task text-generation-with-past `
  --weight-format int4 `
  --trust-remote-code `
  phi3-mini-ov
Testing the LLM
If everything goes well, then we can proceed to test that the LLM is actually running in our machine. Before we set up a more complex interface (like a chat), we want to test it first using a simple script so we can debug easily.
We will run the test using the laptop’s CPU first, and if it runs ok, then we will switch to the GPU. Running models in the CPU is slower but is simpler: we can isolate any issues in our set up before moving on to using the GPU.
Create a file called test_llm_cpu.py with these contents:
from transformers import AutoTokenizer
from optimum.intel import OVModelForCausalLM

model_dir = "phi3-mini-ov"
base_model_id = "microsoft/Phi-3.5-mini-instruct"

tokenizer = AutoTokenizer.from_pretrained(
    base_model_id,
    trust_remote_code=True
)

model = OVModelForCausalLM.from_pretrained(
    model_dir,
    device="CPU",
    trust_remote_code=True
)

prompt = "Explain OpenVINO in simple terms."

inputs = tokenizer(prompt, return_tensors="pt")

output = model.generate(
    **inputs,
    max_new_tokens=80,
    do_sample=False
)

print(tokenizer.decode(output[0], skip_special_tokens=True))
This is a very simple script that provides a simple prompt (“Explain OpenVINO in simple terms.”) and prints out the model’s response (model.generate).
> python .\test_cpu.py
Explain OpenVINO in simple terms.

OpenVINO is a powerful toolkit developed by Intel for optimizing and deploying machine learning models, particularly those related to deep learning. It's designed to help developers and researchers to convert trained models into a format that can be efficiently run on Intel hardware, such as CPUs, GPUs, and specialized AI accelerators.

Here's a break
Notice that the output looks truncated. This is because we set the output to an 80-token cap (max_new_tokens=80). Increasing it will show more text, but the important thing here is that we confirmed that the OpenVino + LLM set up we made is running properly.
GPU Mode
Next is to test the same set up but using the GPU and not the CPU. At the same time, we will also increase the output token cap. This is just a simple change from our test_llm_cpu.py script. Create a new file called test_llm_gpu.py and copy the previous script, but with these changes:
model = OVModelForCausalLM.from_pretrained(
    model_dir,
    device="GPU",
    trust_remote_code=True
)
Adding some simple benchmarking, we confirm that the model runs faster using the GPU than the CPU with a 200 token max output.
> python.exe .\test_llm_cpu.py
Explain OpenVINO in simple terms.

OpenVINO is a powerful toolkit developed by Intel for optimizing and deploying machine learning models, particularly those related to deep learning. It's designed to help developers and researchers to convert trained models into a format that can be efficiently run on Intel hardware, such as CPUs, GPUs, and specialized AI accelerators.

Here's a breakdown of its key features:

1. **Model Optimization**: OpenVINO can optimize models to run faster and use less memory, which is crucial for deploying models on devices with limited resources.

2. **Inference Engine**: It provides a high-performance inference engine that can run optimized models on various hardware platforms.

3. **Model Conversion**: It supports converting models from different frameworks (like TensorFlow, PyTorch, and others) into the OpenVINO Intermediate Representation (IR) format.

Time: 11.31 seconds
> python.exe .\test_llm_gpu.py
Explain OpenVINO in simple terms.
OpenVINO is a powerful toolkit developed by Intel for optimizing and deploying machine learning models, particularly those related to deep learning. It's designed to help developers and researchers to convert trained models into a format that can be efficiently run on Intel hardware, such as CPUs, GPUs, and specialized AI accelerators.
Here's a breakdown of its key features:
1. **Model Optimization**: OpenVINO can optimize models to run faster and use less memory, which is crucial for deploying models on devices with limited resources.
2. **Model Conversion**: It supports a wide range of deep learning models, including those trained using popular frameworks like TensorFlow and PyTorch. You can convert these models to the OpenVINO Intermediate Representation (IR) format.
3. **Inference Acceleration**: Once converted, models can be run
Time: 5.62 secondsLocal Chat Bot
Now that we demonstrated that the LLM is running locally, next is to set up a UI component so we can interact with the LLM via chat. We could build our chat interface from scratch, but a simpler and quicker way is to use something like Gradio to create the UI. Specifically, we will use its ChatInterface module to create the chat with only a few lines of code.
Install the Gradio libary:
pip install gradioThen, create a Python script called gradio_chat.py:
import time
import gradio as gr
from transformers import AutoTokenizer
from optimum.intel import OVModelForCausalLM
MODEL_DIR = "phi3-mini-ov"
BASE_MODEL_ID = "microsoft/Phi-3.5-mini-instruct"
DEVICE = "GPU" # change to "CPU" if needed
SYSTEM_PROMPT = (
"You are a concise and direct assistant. "
"Answer briefly in 1 to 3 sentences unless asked otherwise. "
"Do not add meta commentary. "
"Do not invent extra tasks or instructions. "
"Stop after answering."
)
tokenizer = AutoTokenizer.from_pretrained(
BASE_MODEL_ID,
trust_remote_code=True
)
model = OVModelForCausalLM.from_pretrained(
MODEL_DIR,
device=DEVICE,
trust_remote_code=True
)
def normalize_text(value):
if value is None:
return ""
return str(value).strip()
def build_prompt(message, history):
parts = []
parts.append(f"<|system|>\n{SYSTEM_PROMPT}<|end|>\n")
for item in history or []:
if isinstance(item, dict):
role = item.get("role")
content = normalize_text(item.get("content"))
if not content:
continue
if role == "user":
parts.append(f"<|user|>\n{content}<|end|>\n")
elif role == "assistant":
parts.append(f"<|assistant|>\n{content}<|end|>\n")
elif isinstance(item, (list, tuple)) and len(item) == 2:
user_msg, assistant_msg = item
user_msg = normalize_text(user_msg)
assistant_msg = normalize_text(assistant_msg)
if user_msg:
parts.append(f"<|user|>\n{user_msg}<|end|>\n")
if assistant_msg:
parts.append(f"<|assistant|>\n{assistant_msg}<|end|>\n")
current_message = normalize_text(message)
parts.append(f"<|user|>\n{current_message}<|end|>\n")
parts.append("<|assistant|>\n")
return "".join(parts)
def clean_response(text):
text = normalize_text(text)
stop_markers = [
"<|end|>",
"<|user|>",
"<|assistant|>",
"<|system|>",
"User:",
"Assistant:",
"Instruction:",
"Solution 1:",
"More Challenging Instruction",
"(Note:",
]
for marker in stop_markers:
if marker in text:
text = text.split(marker)[0].strip()
return text
def chat_fn(message, history):
prompt = build_prompt(message, history)
inputs = tokenizer(prompt, return_tensors="pt")
start = time.time()
output = model.generate(
**inputs,
max_new_tokens=60,
do_sample=False,
repetition_penalty=1.1,
eos_token_id=tokenizer.eos_token_id,
pad_token_id=tokenizer.eos_token_id,
)
end = time.time()
input_length = inputs["input_ids"].shape[1]
generated_ids = output[0][input_length:]
response = tokenizer.decode(
generated_ids,
skip_special_tokens=False
)
response = clean_response(response)
if not response:
response = "I’m here. Please try asking that again."
num_tokens = len(generated_ids)
tps = num_tokens / max(end - start, 1e-6)
print(f"Device={DEVICE} | Time={end - start:.2f}s | New tokens={num_tokens} | Tokens/sec={tps:.2f}")
print("PROMPT:")
print(prompt)
print("RAW RESPONSE:")
print(tokenizer.decode(generated_ids, skip_special_tokens=False))
print("CLEAN RESPONSE:")
print(response)
print("-" * 80)
return response
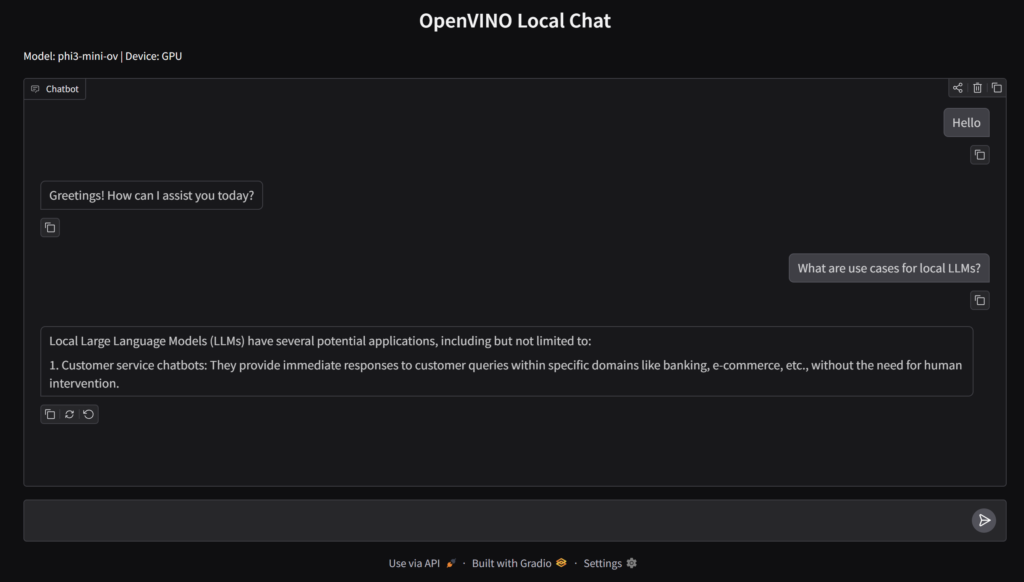
demo = gr.ChatInterface(
fn=chat_fn,
title="OpenVINO Local Chat",
description=f"Model: {MODEL_DIR} | Device: {DEVICE}",
)
if __name__ == "__main__":
demo.launch(inbrowser=True)The important building blocks for our simple chat app are:
SYSTEM_PROMPT– the prompt you send to the model will make or break any application you build using LLMs. In the example above, we instruct the model on what to do (use only 1 to 3 sentences) and what not to do (not add commentary nor instructions). This is the key to prevent the LLM from rambling on if you ask a question.build_prompt– this function adds the “user” and the “assistant” roles to aid in the context of the question.clean_response– the LLM can return text that goes beyond the actual answer. This ensures that we cut off the response to what is important, rather than additional metadata that is not useful to the end-user.chat_fn– the main function that builds the prompt, sends it to the model, gets the model response, and then formats the response. We could also usetokenizer.apply_chat_template()to handle the response, but this results in rambling answers sometimes, so we opted for a more “manual” approach.
Once the file is created, we can run Gradio with this command:
> python.exe .\gradio_chat.pyThis will open a browser tab and shows the Gradio chat interface. Congratulations, you now have your own local AI chat that does not require an internet connection!
Using a stronger model
The hard part of setting up and confirming that our local set up works is now complete. With this, we can explore other LLM models so that we get more performance, better results, and more capabilities.
We will still follow the same process like we did before:
- Download the model from Hugging Face
- Convert the model into the OpenVino format using
optimum - Set the Model parameters in our scripts/app
For example, if you want to use the Qwen 2.5 7B model, just run this command:
optimum-cli export openvino `
  -m Qwen/Qwen2.5-7B-Instruct `
  --task text-generation-with-past `
  --weight-format int4 `
  qwen25-7b-ov
Once the model is downloaded and converted, we just update the Gradio chat app code to use the Qwen model:
MODEL_DIR = "qwen25-7b-ov"
BASE_MODEL_ID = "Qwen/Qwen2.5-7B-Instruct"
A local chat interface for LLMs is cool, but this is just the starting point. There are lots of features and workflows we can use using LLMs, like connecting it to your IDE for coding, or setting up a local RAG system as your own personal knowledge base. Starting small ensures that you are confident that your set up works and what models you can run in your machine comfortably.
Photo by Aerps.com on Unsplash
One thought on “Running LLMs in Intel Laptops”