Code linters such as Rubocop ensure consistent, clean code throughout your application. If all developers are using the same linter configuration, then you can be sure that any code that you encounter is organized in the same way regardless of the author.
One challenge in using linters is that it should have immediate feedback, or else it may disrupt the coding flow of the user. For example, you can run the linter manually after you make your changes, but as this is a manual process it can be easily forgotten.
Commit Hooks
To solve this, we can use pre-commit hooks (such as in git) to automatically run the linter script whenever we try to commit our changes. In this manner, it is an automated process and so will not be skipped in development.
For example, here is a git pre-commit hook for Rubocop (from
https://gist.github.com/mpeteuil/6147292 and
https://github.com/grosser/dotfiles/pull/7 )
#!/usr/bin/env ruby
#
# put this file into your path and use `<file> install` to add a new hook
# or use it as a binary to check changed files

require 'shellwords'

if ARGV == ["install"]
  exec "ln", "-sf", __FILE__, ".git/hooks/pre-commit"
else
  raise unless ARGV == []
end

changed = `git status --porcelain`.
  split("\n").
  map { |l| l.split(" ", 2) }.
  select { |status, _| ["A", "AM", "M"].include?(status) }.
  map { |_, file| file.delete('"') }

exit if changed.empty?

result = `bundle exec rubocop --force-exclusion #{changed.shelljoin}`
puts result unless $?.success?
exit $?.exitstatus
The above snippet is saved as .git/hooks/pre-commit. For this to work you will need to make this file executable:
$ chmod +x .git/hooks/pre-commit
Now every time you commit your code, Rubocop will automatically run but only on the files that you modified, like this:
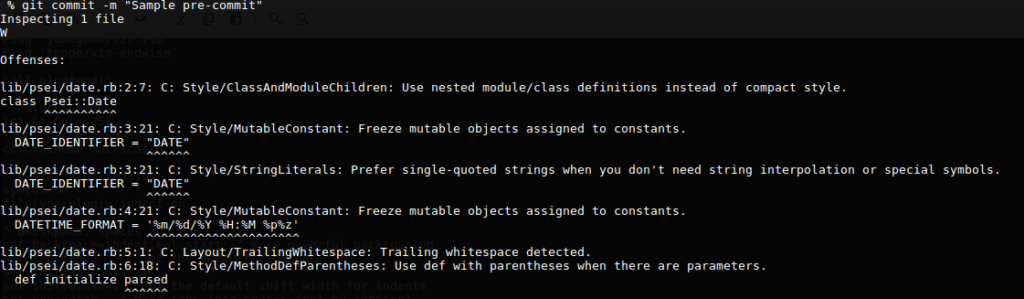
While functional, the output of the script is a bit unwieldy and hard to track. Take note that in all of the examples in this article, your system should already have Rubocop installed, as it is directly invoked in the scripts that we will use.
Using ALE
ALE is a Vim plugin that provides linter checking while you are typing. This sounds like a little improvement but having this tool in practice is a literal game changer. You do not need to remember anything in your workflow in order for linting to be done, it will be shown to you in real-time as you type!
And since this is a Vim plugin, you can easily include it in your vimrc file and have it set up on any machine that you develop on. Installing ALE is easy if you use a plugin manager like vim-plug.
In this example we will also install another plugin called vim-airline. The vim-airline plugin makes your status bar display better information, but the main reason we will include this is because ALE automatically integrates with vim-airline.
Add this in your vimrc file:
Plug 'w0rp/ale'
Plug 'vim-airline/vim-airline'
Now we configure ALE to suit our purposes. By default, ALE runs all of the applicable linters for the language you are currently working on. For example, for Ruby it will try to run your code against Brakeman, Rails Best Practices, Rubocop, and Rufo. I found that each linter consumes a bit of resource in your machine, and so it would be best to just run the linters that you actually intend to use.
In my experience the Rails Best Practices process consumes too much CPU to my liking, and so I decided to just run Rubocop automatically and disable the rest. To do this, put these in your vimrc file:
" Set specific linters
let g:ale_linters = {
\   'javascript': ['eslint'],
\   'ruby': ['rubocop'],
\}
This configuration alone will not do the job, and you still need to instruct ALE to disable everything except the linters you specified explicitly:
" Only run linters named in ale_linters settings.
let g:ale_linters_explicit = 1
Then we enable integration with vim-airline so that lint errors are shown in the status bar:
let g:airline#extensions#ale#enabled = 1
By default, ALE will mark the lines in your code with errors with a special marker (e.g. “–“) so that you know immediately if that line has a lint issue. Moving the cursor to that line will show the error message in the status bar. Now this special marker is shown at the leftmost column of vim (before the line numbers). Normally this extra column only shows up once ALE has processed the file, but you can always enable this extra marker column so it behaves smoothly:
let g:ale_sign_column_always = 1
In addition to the marker, ALE also highlights the parts of your code that has a lint issue. While useful to know the exact location of the offending code, this interferes with any syntax highlighting you have. I prefer to disable ALE highlights and keep the current syntax highlighting so it is easier to read. To do this:
" Disable ALE auto highlights
let g:ale_set_highlights = 0
Once you have everything set up, whenever you use vim with a Ruby file, you will get real-time lint checking:
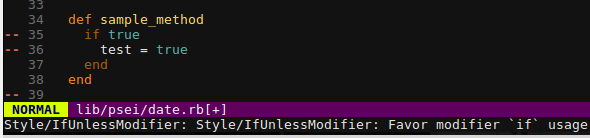
Coding tools like linters make your life as a developer easier and makes your code friendly to other developers. Instead of looking at these tools as a distraction from your work, think of them as a way to improve your coding skills. By setting up these tools and integrating them with your favorite editor, you will find that they can be seamless and practical in your day to day work.
Photo by Matt Popovich on Unsplash
One thought on “Rubocop + vim”